A natural extension of any dating portfolio is blogging. I wrote an article on Blogger basics for SEO that you can read here. I would now like to explore how to leverage WordPress blogs for promoting and reviewing your dating sites.
Wordpress is the world’s favourite blogging platform with hundreds of free and premium templates and plugins. It can be a bit of a minefield to start off with, so I have put together a brief starter guide on how to set up WordPress blogs for content and SEO. I will be following this up with more advanced techniques in later articles.
WordPress Blog or Website?
There are two options with WordPress – the first is to set up a blog on WordPress’s own hosting platform. The advantages are that you don’t need a hosting account to run the blog, nor do you need a domain name. You choose a blog name and as long as it’s available, you’re good to go. The major downsides are that you don’t have much flexibility on adding in useful plugins, and you are exposed to WordPress’s blog police. I had a blog closed down by WordPress for violation of its policies, without warning.. So, if you have adult or casual dating sites, be warned that this is probably not a good option.
The second option is to set up a WordPress blog on your own hosting platform. There are a number of hosts out there to choose from; the best I have come across in terms of value and bandwidth is with Hostgator. The best plan is the Baby Plan, which is a very low cost option for the unlimited domains and bandwidth you get with this package. Hostgator uses an industry standard control panel, which will automate the installation of your WordPress blog. You will then need to redirect your chosen blog domain name to your Hostgator hosting account and your basic blog will be set up.
Getting started with WordPress
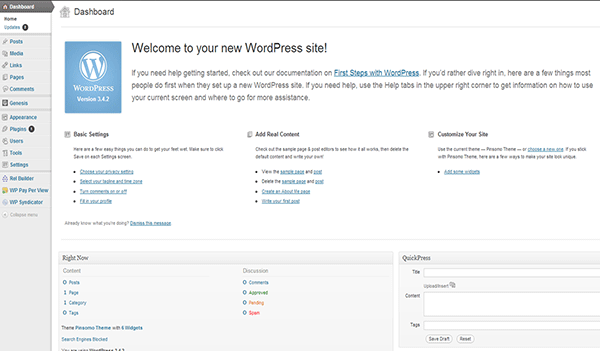
I will not go into template selection and site design/layout, but please let your account manager know if you would like an article on this and I will put one together for you. The objective of this article is to go through the SEO settings in your WordPress Blog control panel, or Dashboard, which will look like this:
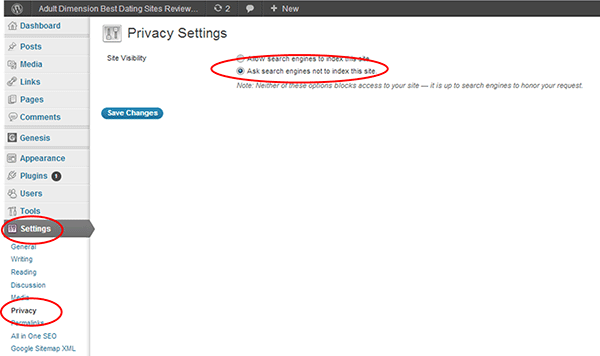
The first thing I always do when I have set up a new blog is switch off site access to search engines. The reason I do this is that I want to control when search engines visit the site and I want some content on there when the search engines first crawl the site. You do this under “Settings” and “Privacy” – select the second option “Ask search engines not to index this site” and save your settings.
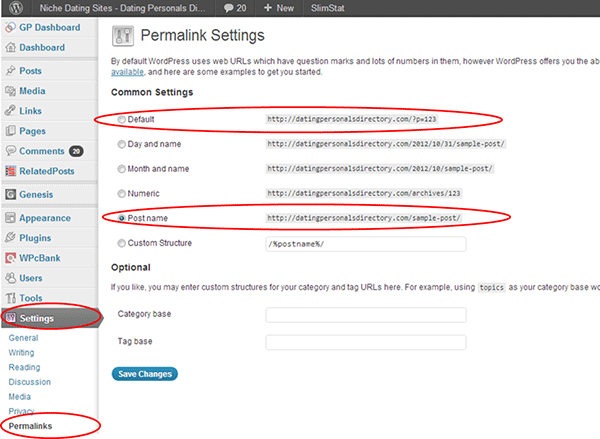
The next thing to do is to change your blog post settings to show the post title in the URL for the post, instead of the default coding. This is done in the “Permalinks” section under “Settings”. The default uses a coding structure that is meaningless to search engines, so choose one of the other options to create a readable URL description/tag of the post:
WordPress Plugins
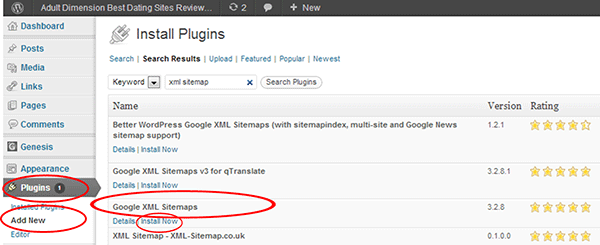
It’s now time to start adding in some plugins. These are effectively macros which do very specific things for your site. The first one is to find and activate XML Sitemap Generator for WordPress. This plugin will generate and regularly update a sitemap for your blog and notify the search engines of changes so the search engine spiders or bots will come and take a look! This plugin will generate a special XML sitemap, which will help search engines like Google, Bing, Yahoo and Ask.com to better index your blog. With such a sitemap, it’s much easier for the crawlers to see the complete structure of your site and retrieve it more efficiently.
Finding and activating plugins with WordPress is easy; in the index bar on the left, select “Plugins” and “Install new”. Then search for “xml sitemap” in the search box, locate the plugin, select install then activate it. Simple.
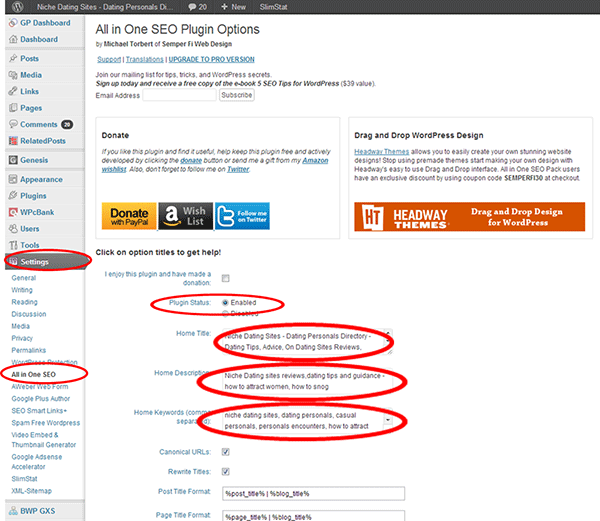
The next plugin to load is All In One SEO, so go through the same process as above, install and activate the plugin. The first step is then to configure the All in one SEO general settings, which you do here under “Settings”, locate the “All in one SEO” tab:
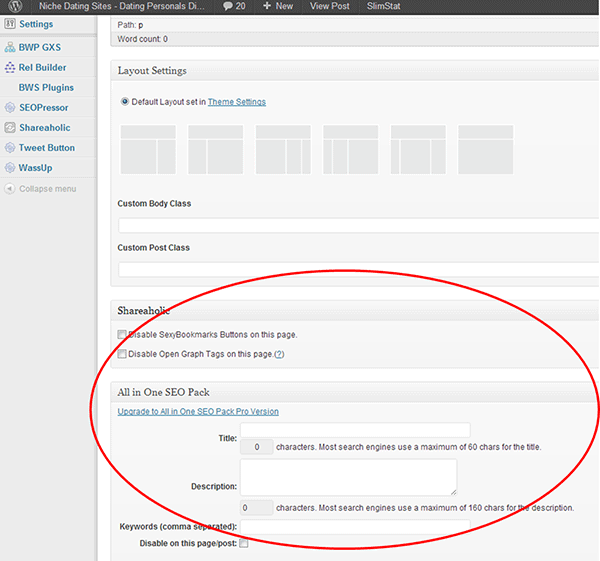
All in one SEO also creates tabs under each post for you to complete with a Title, Description and keywords. Scroll down to the bottom of the “Add/Edit Post” screen to find this section and complete it with keyword rich and relevant content. Be mindful of the limitations on characters that the plugin recommends for SEO, e.g. a maximum of 60 characters for the “Title” description:
Finally for this article, take your keywords and add them as Tags. The box for this can be found by scrolling down the “Add / Edit Post” screen and is located on the right hand side of the page.
Once you have added in two or three posts, go back to Privacy settings and allow search engines to index your site. You can then use your site map, which will be at this location – “http://INSERT YOUR DOMAIN NAME HERE/sitemap.xml“, to index your blog with Google Webmasters. This is also explained in Blogger basics for SEO which you can read here.
I will be writing a further article in the next few months on WordPress blog SEO that will include some more advanced techniques and plugins. I hope you have found this introduction useful and can put these techniques and ideas into practice for your benefit. If you like the article, please share it and follow me on Twitter and Google+. Much appreciated, thanks!
Best Wishes,
Steve Bolton aka Dateblogger