As I have a number of sites with World Dating Partners (WDP) that are transferring over to Dating Factory, I have been reviewing my checklist of things to do on the sites and activities around them. I thought it would be useful to share it with you. It’s also a good checklist to have when setting up a new site from scratch.
This first checklist will cover steps to take on the site itself and links to site indexing, key tracking and performance monitoring activities. Subsequent articles will cover steps on blogs and social media. The checklists are a high level overview, but don’t worry, each area has either been covered already and I will link to the detail where appropriate (there are some great tutorials from Dating Factory on the detailed steps), or the steps will be covered in future articles. So stay posted!
I will be exploring steps you can do at no cost and steps that require some funds. If you have no budget to spend on advertising, don’t worry, there are a lot of things you can do that won’t cost you a thing. They may take a while to kick in, but once you start to get some traffic and conversions, think about reinvesting some or all of that income into paid advertising and/or media buys. These options will be covered in later articles, but first things first.
This checklist starts from the point at which you have sourced your domain name, chosen your template, changed your DNS settings and your site is live. So you are open for business, what next? You can have the best looking site and the best domain name in the world, but if no-one knows it exists, no-one will visit and experience all you have to offer.
This starting point is also relevant to any sites that have been transferred over from World Dating Partners, which will require the following steps to update them.
- If you have a site targeting a specific country, territory or city, or want to restrict your site’s members to a group of countries, change the target country settings under “Initial Settings”. Save your settings.
- Think about the target countries and decide which tariff you want to charge. I go for Standard or in some cases Elite on the basis that my niche dating sites are of a high enough quality to justify an “Elite” or premium tariff.
- Under “Front Page (Basic)” settings, upload a logo or banner for your site. These can be developed in Powerpoint if you have it; the functionality in Powerpoint is of a high enough standard to create some good looking banners or logos. This is one I created for a site that has transferred over from WDP; I’ll be covering how to make banners and particularly an easy way to resize them in a later article:

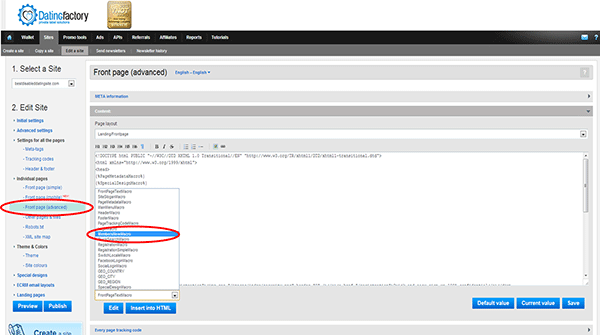
- Adjust your members’ profiles content:under “Front Page (Advanced)”, there is a drop down box to select macros; click on the drop down and find “MembersNewMacro”:
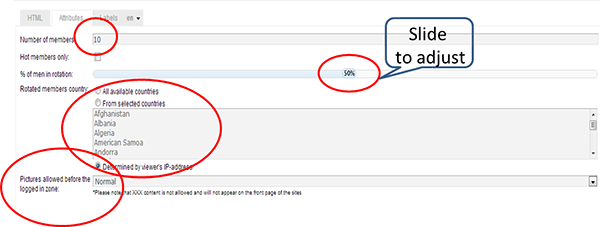
 This is where you can set the attributes of the members’ profiles which appear on your site. On the pop up screen, click on “Attributes” and this screen will appear:

Adjust your site’s settings to show the number of new members you want displayed, and the mix of men to women in the profiles (this is important under “General Gay Dating” for example, you can adjust for gay men or lesbian women to show, otherwise you will get women appearing on a site for gay men and vice versa). Also, think about the related members’ country you want to show. For example, I have a site for Sweden where I also include members from neighbouring countries (Norway, Finland, etc); in this instance I set my members’ profile to Sweden, on the basis that someone from Norway is on the site to find someone in Sweden. It’s worth experimenting with – you can set up different landing pages to test, with different attributes, which is covered in this Dating Factory article on generating test landing pages. - Upload your Google webmaster html file to the site, or insert your Google metatag into the tracking codes section of your admin panel. If you need help with this, contact your account manager or check out this article on editing/managing tracking codes.
- Insert your Google analytics code for your site into your tracking codes. This will give you some great insights into traffic analysis from a number of different viewpoints, and will be covered in later articles.
- Set up links on your home page to other relevant dating sites in the same niche. So, if you have a number of general dating sites, cross link them on your landing pages and on the links section of your sites. You can see an example of a landing page with cross links here on one of my sites Swiss-Sex-Chat.com, where at the bottom of the landing page, I include links to my other Swiss sites. These sites also include the relevant cross links to my Swiss sites. If you only have one site, find relevant sites from Dating Factory’s list of sites, which you can advertise as an affiliate. Any sales you generate from such an affiliate link on your site will have a shared commission percentage. My stance is that you have generated traffic to your site, which might not be quite what the visitor is looking for, so offer a few more relevant options and you may get some click through traffic from your site and potentially sign ups and subsequent commissions. Without these options, the customers will just go elsewhere if the site doesn’t appeal to them – at least give them an option of a relevant click through from your site. Under “Affiliates”, click on “Add new campaign” for relevant sites by niche. Once you have the link code, add it to your links page or home page. How to do this will be covered in more depth in a later article.
- Ensure that you maximise the Dating Factory promo tools by including the IM Pop Up chat box and Members’ block in your site. This was covered in an earlier article of mine, which you can read here – “Are you making the most of your Dating Factory Promo tools?” This is a great way of customising your site, making it stand out and differentiating it.
- Submit your (new) site to directories. This can be done manually, which is laborious, or you can use a directory submission tool. The one I favour and use all the time is IndexBot, which you can check out at here at IndexBot.DIYSEOSoftwareTools.co.uk. It’s a very simple, fast and effective way of submitting your site to directories, and getting backlinks to your dating site. Most of the submissions are automatic, but some require authentication so watch out for confirmation emails to ensure that your site is indexed.
- Write some unique, keyword rich content for your site – this is an important step. You can use a text spinner to create multiple versions of the same text for use on different sites. I use Llama Spin, which enables you to create a source document and “spin” it to create unique variations. The syntax is easy to work with, although it takes a little time to prepare your base document, but once done you will be able to generate unique variations of the content to post on your sites. This will be covered in more depth in a later article.
- Add in videos to your site – this was covered in this article on promoting your site on YouTube, the world’s second largest search engine. Did you know that you can create videos from Powerpoint presentations? This is an example of one I created for my site Women Seeking Men. I will show you how to do this in a later article.
- Add in keywords and metatags – for both new sites and sites transferring from WDP, make sure you do this step. It is covered in more depth here in a Dating Factory article on editing metatags. Also, ensure that if you have a multi-language site, you edit each page for each language you have selected.
In summary, the objective of this article is to give you a checklist to run through when setting up a new site , or checking that any sites transferred from WDP leverage all the fantastic features of the Dating Factory platform. Unless you have a disciplined approach, and a checklist to work through, it is easy to overlook some of these steps. There are some great tutorials in support of these activities on Dating Factory’s Tutorials page; this article aims to give you an insight into the key areas that I focus on when setting up and developing my sites, which I hope you will find useful and practical.
The next two articles in this series will look at a checklist for blogs and social media activities. If you like the article, please share it and follow me on Twitter and Google+, much appreciated, thanks!
Best Wishes,
Steve Bolton aka Dateblogger